Sunday, October 7, 2012

It's Pumpkin Pickin' Time

We grew 19 pumpkins this year and I was excited to start prettying them up. This year we did not carve just craft, glue, sparkle, paint, and mod podge.


The Mummy we wrapped in White duck tape and then cut out eyes and mouth with foam/felt/paper and glued red jewels for the eyes. Super easy took 15 minutes

 
My daughter made the Frankenstein. She used green Duck Tape, Felt piece for the hair, pipe cleaner for the eye brows. I used hot glue

 
I first painted the pumpkin green. On the last coat I sprinkled with glitter. I used white glue to put the sparkles on. I wrapped the stem with ribbon using hot glue. I hate the prickly stems of the pumpkins

 
My daughter made the spider and web. She painted her pumpkin black. When it dried she used white puff paint for the web. We made the spider out of a foam cup and 4 pipe cleaners


Angry bird we painted red, painted the brown belly and yellow beak. We bought the foam sticker kit (WASTE OF MONEY) for the eyes, hair and tail. We could have made a better one myself. Oh well

 
The leaf pumpkin I painted white then had the kids find leaves outside. I glued them on and then mod podged over them. It didn't turn out as cool as I would have liked but it only has to last 3 weeks. I wrapped the stem with ribbon.

Friday, July 27, 2012

Pencil Box

It's back to school time which means all new school supplies. The last thing on my list was pencil boxes for the girls. We were looking around the stores and my choices were small, pretty, and expensive. Or right size, cheap, plastic, and boring. So I got the cheap one $.57 and told the girls if we found something later that is cool I would get it for them. We got home and got to thinking how can I make this cute? I looked on Pinterest and didn't see anything really. So I got out all my boxes of craft supplies and started to think.....hot glue? Mod Podge??? MAYBE. I thought what the heck if I ruin it than I am out $.57 and I will go buy another one. Aspen said she liked the bug paper so I cut out a strip, crossed my fingers and started to Mod Podged. And to my surprise and Aspen's it WORKED!!!!!! I was so skeptical I didn't even take pictures until the end.

Aspen LOVED it so much she is now SUPER excited for school. GOOOO MOM!!!

All I used was scrapbook paper, mod podge, stickers and felt. Everything I had in my supply box.

 Boring cheap plastic pencil box
 Supplies, paper ( I used 1/2 sheet), stickers, mod podge and felt

Instead of using a boring sharpie to write her name we used stickers  and added a few extra stickers for cuteness
Put a layer of mod podge on the plastic box and a layer on the paper. Press and squish all the bubbles and excess glue out. I did one side at a time and let the paper dry until I was sure it was smooth. It's a little time consuming but I was determined not to ruin this box.


 After all the sides are done, let dry 20 minutes and then put the top layer of mod podge on and smooth out. To make sure you get all the bubbles and wrinkles out. Don't worry the mod podge will dry clear

 I had some left over felt and decided to line the bottom to make it quieter. Aspen was super excited it was purple. I used a little spray glue
 The finished product and Aspen's favorite school supplies: her new backpack and pencil box.

Sunday, May 27, 2012

Weight Loss Jars

My SIL Amy came over today and while the men worked on the boat we got to craftin. She needed some glass rocks and ribbon which I had. Her man made her some vinyl stickers and we put them on. Counted out rocks, for how many pounds she had already lost and how many more she needs to lose. After we did that we decided it needed to be made pretty, so we found some ribbon to put the finishing touches on. She left me some stickers so I can make a jar for me.....ONE DAY I will start.

WHAT A CUTE IDEA!!! I TOTALLY Loved it and had to take pictures while we were working


Saturday, May 26, 2012

What a Difference a Day Makes

I have seen this photo around on Etsy and Pinterest and decided to make my own. I did it on Word (I really need to learn Photo shop). It was real simple, the only hard part was making it a jpeg. So I had to save it in Word as a PDF then I had to open it in Adobe and save it as a JPEG. The quality wasn't perfect but as soon as I learn Photo Shop I am sure I could do it better. OR if you had a photo printer at home you could just print it from Word on photo paper and be good.
Then I had it printed at Costco for $2, I painted the edges of my canvas to try and match the grey. I then mod podge the photo onto the canvas, let dry for 20 minutes. Then put a top coat of Mod Podge on top. Let it dry completely. Then I found some ribbon, stapled it on back and tied it at the top. I hung it from the ribbon but I also used Command Velcro to help take the weight off the ribbon


At the bottom it says
"What a Difference A Day Makes"
I put everyone birth dates and names in order of oldest to youngest.
I have also seen it without names just dates which was cute also
I blurred out our dates just for safety of course:)


Okay I tried my hand at photoshop and made this....what do you think????

Friday, May 4, 2012

Kitchen Sink Storage

I found this organizer at the Dollar Store for a $1. I had it for a while, trying to figure out where to put it. I wanted it for my bathroom cabinet but it was a tad to long. I tried my kitchen sick door and it fit perfectly. I had to trim the corner to fit under my child lock and I removed the cord it came to hang it with. I raided my husbands barn and found some short screws and his drill. I pre-drilled 2 holes and screwed it up. Perfect for those small items that always get lost under the sink.

I used a little duck tape to hold it in place while I marked my spot

Emergancy Candles

On Pinterest I came across this pin on how to make your on 50 hour Survival candles. It looked easy enough so I ordered my supplies and got started. I ordered my wicks and 5 pounds of soy wax from Amazon, I got my jars from Walmart. I put it off for a bit I was a little nervous melting wax on the stove and was thinking the best way to do it. So I researched a little bit more and decided to try melting the wax in my microwave in my Pyrex measuring cup. What do you know? It worked and was easy. I did all 12 candles in about 1/2 hour, I was all done before I had to take X to preschool. Now all I have to do is run to the dollar store and get some matches. Here is the blog I followed and has really good instructions.
I think they are good for 40-50 hours
I spent $40 for all my supplies and made 12 candles so that is $3.33. I could have gone cheaper buying my wicks and bases separate but my husband placed the order for me. But now I have like 90 wicks left for more candles. It was the shipping that killed me.
5 pounds of Wax: $9.25 + $5.49 shipping
Wicks: $7.50 +$7.50 shipping
12 Jars from Walmart $9


I hot glued my wickes in

 I melted the wax a little at a time, I didn't want an explosion
 all done, the wax was really easy to scrap off my stove and clean up
 I made 12 candles with a little bit of wax left over
 I saved the box my jars came in and put my finished candles in them

Baby's First Year

My baby is coming up on his First Birthday *sniff* so I was trying to figure out what to do for his year photo collage. For my oldest daughter I did a picture frame, for my second daughter I did a photo collage, and the boys I did nothing. Well I found these cute paper mache letters at Joanne's and decided to Mod Podge Pictures on them. First I painted them black, then I printed off black and white pictures on my laser printer on regular paper so it was easier to work with (and cheaper). I cut them up and layed them out. I did all the pictures in black and white except the first birthday and I did  that in color. Then I Mod Podge, it was easy and turned out great. I finished X's since he is 4 years old (I was a little behind) I will do Steelie's in a month.


Sunday, April 15, 2012

Photo Canvas

*Warning I am not a craftier or an artist and this was my first time mod podging*
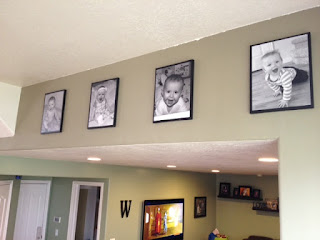
A while back I had 4 faux canvas made at Walmart to hang on my wall. I thought $20 is WAY better than $60. But as soon as I got them home and my husband was hanging up I knew they wouldn't last. He was complaining and cussing about how cheap they were, made out of cardboard and they would lay flat on the wall. So I knew I had to do something. I was just going to buy one expensive canvas a paycheck to replace them but never got around to it. Then I was researching modge podge and had some extra canvas from my crayon project so I thought I would try my own.

Supplies:
Canvas
Paint or scrapbook paper
Mod Podge glue
Photo
 I had mine printed at Costco same day. I had the option to add a black border and I did. I think it made it easier to hid my mistakes. For 4 prints of 11x14 it was $12

First I was going just to paint the edges but then my husband took them outside and sprayed painted them all. (some people cut scrapbook paper up and mod podge them on the side. Sounded to hard)


Top is after I applied a thin layer of mod podge on the canvas
 Opps pictures are backwards: Bottom is the canvas after my husband painted them black

 Then I layed the photo down here is the problem:
I read to not trim your photo until after BUT that is hard and not very pretty.
So I would trim your photo to fit then lay it down
 LET DRY FOR at Least 1/2 hour Before appling the top layer of mod podge. I probably put it on a little heavy, try to do it more light layer and smoother. Let dry ( I went to bed)
 The next day my photo's looked less shinny and pretty
 Then I had to trim them and make them less pretty. But I did and then I used a black sharpy to cover up my jagged cutting. Then I applied a thin layer of Modge podge to the edges. See this is where if you had trimed before you would be DONE.
 BUT they still look better than the cheap cardboard ones from Walmart, but I bet if I do it again they will look TONS better. But not bad for my first time.
Just waiting for them to dry and then my husband will put picture hangers on them and hang them up:)

An hour later......
ALL DONE:)